Working in a community

Working with a community can be a challenge, but it can really be worth the time and effort that you put into it. The idea seems so natural, you go to a public space tell people that there will be free supplies and instruction and that the exchange of ideas is welcome, you invite everyone with out prejudges and let the magic happen. The reality of community work is much different.

IMG_5581

The reality of working with and within a community is that everyone is busy, they have set schedules and plans, they need time to plan, information, support to attend, and to feel like they have ownership of the idea or event. And if something is NEW then how will they know it will be a success? Taking a risk in front of others can be scary. So as an artist working with community groups you may find yourself sitting alone with supplies and gear for hours, you might end up talking to 30 people and getting 3 to take the risk with their time and ideas. Or the other extreme may happen, you plan for at the most 20 people to show up and then 50 people are there excited and busy and you realize that your workshop is scheduled to go one for another hour, how many more people can you accommodate (this is the best problem to have).

This project had its moments that fell into each category, fortunately with lots of planning and coordinating the slow and busy moments were all successful.

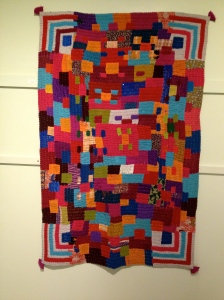
Just over 50 people participated in different parts of this project from dyeing fabric to quilting, from piecing the quilt to documenting it. In addition another 100+ people watched different parts of the project develop, talked with participants, and watched demos.

Tips for working in a community:

Partner up! Have other people help reach out for you, use space or supplies, or even experts. Connecting people with their community benefits everyone, many businesses are happy to help send out emails or post flyers or even share space, this is much better than a donation of supplies of money!

Show up! You say your going to be there, be there. A few years ago I worked with a new group of teenagers and they were skeptical, people showing up once or twice and then disappearing had burned them before. I showed up twice a week for 4 weeks and sat with supplies and ideas before they trusted me. It was followed by a deep long lasting 2 year relationship. Totally worth my investment in time.

Be prepared! That’s right you could have 2 people show up, but it could be 200, so be ready.

Celebrate your effort! Even if no one shows up, get yourself a cupcake, don’t lose heart.
 

Basic shibori

Shibori is a Japanese term for methods of dyeing cloth by binding, stitching, folding, twisting, and compressing.

At the workshops there were several different dyeing techniques made available. Shibori fabric was prepared at the workshop and I finished the vat dyeing later due to time constraints.

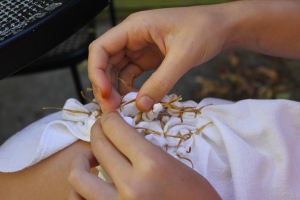
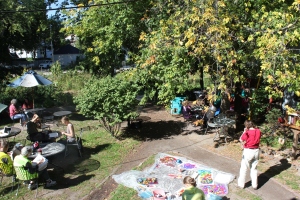
Kanoko shibori is the traditional name for what is very similar to western tie-dye. It involves tying certain sections of the cloth to achieve the desired pattern. Traditional shibori requires the use of thread for binding. We used wax covered thread to help resist the dye; you can easily use waxed dental floss. The pattern achieved depends on how tightly the cloth is bound and where the cloth is bound. If random sections of the cloth are bound, the result will be a pattern of random circles. If the cloth is first folded then bound, the resulting circles will be in a pattern depending on the fold used. We sat in the sun sipping lemonade and tea while tying very small pinches of fabric and talked about some of the ideas middle school students had proposed for the quilt.IMG_5582IMG_5583

Some other shibori techniques are: Miura shibori, Kumo shibori, Nui shibori, Arashi shibori, Itajime shiboriIMG_1397

Rust dyeing

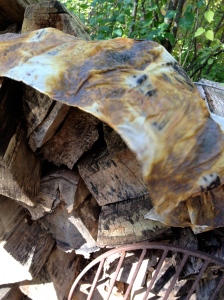
Rust dyeing is an unpredictable process with lots of possibilities.

IMG_0113

I will be giving you all the information I have so you can create your own techniques, patterns, and colors.

What is rust?

Rust is a general term for a series of iron oxides, usually red oxides, formed by the reaction of iron and oxygen in the presence of water or air moisture.

You can speed up the rusting process with water and vinegar, or water and salt, but remember: if the metal is galvanized, it has a protective coating against rust.

Steel is a type of iron so it will work, too.

What can you dye with rust?

Almost anything, so be careful when you are washing out your fabric. It can stain your clothing.

Rust dyes cotton, silk, wool, rayon, polyester, plastic, wood, most anything.

How do you make the dye permanent?

Maybe this section should be titled “how do I get rust out?”  Because, trust me, it will be permanent! To help ease the setting process I recommend salt and water for the cotton and plastic, and water and vinegar for the silk, wool, rayon, and lighter weight fabrics.  In addition, the other key ingredient is time. This will take several days, but it’s worth the wait.  If it’s hot and muggy, leave it outside in a black plastic bag to speed up the process (it can finish in 1-2 days if it is warm). If cool, just leave inside for 5-6 days.

Bleach will further set the rust, then eat through the fabric; the only way to remove it is with a plumbing rust remover.

What is tannin?

Tannins are astringent, bitter plant polyphenols that either bind and precipitate or shrink proteins. Tannins are incompatible with alkalis, gelatin, heavy metals, iron, lime-water, metallic salts, strong oxidizing agents and zinc sulfate.

You can find tannin in: black tea, red wine, pomegranates, persimmons, nuts (especially walnuts), and many other foods.

Tannin will create a color ranging from dark grey to blue to green.

What are other natural dyes?

There are many other natural dyes out there that will work well with this process.  In traditional natural dyeing techniques, a mordant or binder is used to help the color become permanent: Alum, Copper, Iron, Tin, and some others that are harder to find. But because you are dyeing with a mordant as your primary dye you can add may things to get color. You will be natural dyeing in reverse.

The following websites have a great list of natural dyes and some other good info http://www.joyofhandspinning.com/natural-dyes.shtml http://www.aurorasilk.com/info/natural-dying.shtml http://www.pioneerthinking.com/naturaldyes.html

Some things you may want to add to your dyeing: onion skins, madder root, brazil wood,  weld, lichen, lilac twigs, pomegranate, raspberries, beetroot, ivy twigs, coffee grinds, red cabbage, Virginia creeper, and even the not so natural Kool-aid.

Copper also effects the dyeing. It will add a light green tint to the cloth, but more profoundly, will work as a magnet to draw in the rust and darken the dye.

What supplies do you need?

Rust (steel wool), Silk, Plastic bag, Gloves, Tea bags (these are optional)

Water & Vinegar

How to . . .

Wet your fabric, not dripping, but wet.  If you are dyeing something that requires vinegar, then wet with a 50/50 water vinegar mix.

Add rust. Sprinkle, spread, drape, wrap, smother, cover, cradle, or what ever else you can dream up. You can add the tea bags or other natural dyes, too. (I love to add a couple tablespoons of red wine).

Put it in plastic: this makes your job easier because you want it to stay damp for 3-4 days.

Then wash it out by rinsing with laundry detergent until the water runs clear.

Let it air dry, then iron with care. I always protect my iron with paper (in case any steel wool I missed scrapes it).

Making sunprint squares

IMG_0115

There are several ways you can make these, but after trying out a few I have a personal favorite: Jacquard SolarFast. SolarFast dyes are used to create photograms, continuous tone photographs, shadow prints, and ombrès on fabric and paper. SolarFast is also great for painting, tie dyeing, screen printing, stamping, batik and more! Permanent on all artist papers and natural fabrics, including cotton, linen, canvas, silk, hemp, and wool. Color is washable and lightfast and leaves fabric completely soft. -from Dharma Trading Company

You just need a sunny day and you are good to go!

Get objects or foam paper cuts ready to go, plan out your design, or fly by the seat of your pants. I suggest the foam paper because it is opaque and less likely to fly far and away in a breeze. Paint the SolarFast on your fabric and lay your pattern down. The transformation is very fast. Once dry, wash with the special SolarFast rinse.

If you want to have the students design their own squares and then make the sunprints later (for example: if it isn’t sunny, or if time is a concern, etc.) here is a great way to do that too:

IMG_0114

Have the student use foam paper or thick card stock and cut their pattern, then stick it to clear contact paper.

IMG_0162

IMG_0164

A few books

Here are some of my favorite books about quilts, children’s books, artists books, technical books, and more! (I will continue updating this).

The Quiltmaker’s Gift by Jeff Brumbeau (Author) , Gail de Marcken (Illustrator)

The Quilting Bee by Gail Gibbons (Author, Illustrator)

Stitchin’ and Pullin’: A Gee’s Bend Quilt by Patricia McKissack and Cozbi A. Cabrera

Sweet Clara and the Freedom Quilt by Deborah Hopkinson

The Patchwork Path: A Quilt Map to Freedom by Bettye Stroud

The Keeping Quilt by Patricia Polacco

The Twins’ Blanket by Hyewon Yum

501 Quilt Blocks: A Treasury of Patterns for Patchwork & Applique (Better Homes & Gardens Cooking) by Better Homes and Gardens

Japanese Quilt Blocks to Mix and Match by Susan Briscoe

Calendar

So I have dates ready to go! I’m still looking to have a few more workshops. If you or a group is interested, let me know and hopefully we can work something out!

dyeing

Fabric Dyeing Workshop:

What: This free workshop is aimed towards high school girls, but middle school students who will be participating in other workshops are welcome. The fabric that is dyed will be used in the quilt project and every participant will receive photographs of the final work.

When: September 29, 2pm-4pm

October 13, 2pm-4pm

Where: Absolutely Art 2322 Atwood Ave., Madison, Wisconsin 53704

Quilting Workshop:

What: This free workshop is aimed towards high school girls, but middle school students who will be participating in other workshops are welcome. The fabric that is dyed will be used in the quilt project and every participant will receive photographs of the final work.

When: December 7, 3pm-5pm

Where: Stitchers Crossing 122 Mineral Point Rd  Madison, WI 53705

TBD workshop at Sewcial Lounge

Jefferson and Spring Harbor Middle Schools also have workshops happening on Thursdays.

For more information on any of these or other workshops please feel free to contact me : elkeown@hotmail.com

Getting started

Currently I’m working on a calendar…

If you, your school, your friends, your child, or your business want to be part of this, then let’s make it happen! I’m currently planning workshops that are 2 hours long.  These can be one-time meetings or several meetings. I’m not able to offer workshops outside of Madison at this time, but I’m currently pursuing more grant money to expand this project. 

-Emily Keown

elkeown@hotmail.com

Keown_06